Double Chocolate Layer Cake

chocolatecake3

This is a great everyday cake. Because other people make cakes just because, right? It’s also a great birthday cake, retirement cake, anniversary cake, Valentine’s Day cake, Arbor Day cake, Brewers finally won today cake, you had a hard day at work cake… See, you can come up with a cake reason any day of the year. Plus, this cake is so easy to make. Mix dry ingredients, dump in wet, mix. That’s it.

For me, it’s only made from pantry ingredients that I normally have on hand anyway, so I really can bake it up whenever the mood strikes for chocolate. The cakes bake up light and springy with a high dome. Most people cut off the dome to even it out for easier layering, but to me that’s just wasted cake. I just keep the dome and fill in where I need to with extra frosting glue. Plus I don’t care how it looks when it’s done; if it’s domed on top, fine, just means more cake. If you’re feeling fancy, cut that dome off.

Continue reading

Share Button

My Favorite Chocolate Chip Cookies

chocolatechip3

Forget apple pie, chocolate chip cookies should be America’s iconic baked good. Everyone loves them, you can get them anywhere, and they’re easier to make than apple pie. 

This is my favorite chocolate chip cookie recipe. It uses browned butter to impart a toffee-like flavor that you generally only get from aging the dough in the fridge for a day or so (as started by the NYT famous recipe). While I’m sure that recipe is pretty damn delicious, I never plan ahead to make cookies. When I want chocolate chip cookies, I need them NOW. Maybe other people can plan ahead for their cravings, but not me. (That is also why my most common brownie-baking time is midnight.)

Continue reading

Share Button

Apple Sour Cream Crumb Pie

applesourcreampie

I’m not a math person, but I am a dessert person. So pi day becomes pie day, because any excuse to make pie is a good excuse.

Apple Sour Cream Crumb Pie is a mashup of apple pie, creamy cheesecake, and apple crisp. Apples are sliced and mixed with an entire 16-ounce container of sour cream, cinnamon and vanilla, plus eggs and flour for binding, then mounded into a pie crust and topped with a nut-studded pile of cinnamon crumbs.

This recipe makes a monstrous pie. The apple filling will need to be placed and poured carefully since it stands a good 4 inches above the rim of the pie dish. Maybe if you placed the apple slices more carefully instead of dumping them all in like I did, you can avoid stray slices falling on the floor. As it is, just do your best to arrange the apples so things aren’t sticking out, because those bits do get pretty dark in the oven. Because this pie is so dense, it needs almost 2 hours in the oven.

Continue reading

Share Button

Peanut Butter Brownies

pbbrownies

I probably don’t need to say it, but holy decadent, batman!

I had these beautiful brownies bookmarked over at Loves to Eat for the longest time, just waiting for an excuse to make them. I figured Labor Day, and specifically my friend Lynn’s party, was good enough for me. As an added bonus, other people would be at this party, ensuring I wouldn’t eat the entire pan myself. Thanks, other people.

These remind me of the chocolate peanut butter cake I’ve made, but with much less effort and time expenditure. But the payoff is still awesome. The brownie base is super fudgey and rich, so I cut these into 24 squares and one is plenty (at least for a couple hours!). The peanut butter filling is really just frosting, which works for me. And the topping originally didn’t call for any cream, but I wanted something that wouldn’t set up as a hard layer, and adding a bit of cream to make a ganache worked out perfectly. The peanut butter layer is soft and silky and the ganache is smooth but still a bit soft, even from the fridge.

Make these. You know you want to.

Peanut Butter Brownies

Brownie layer
1 c butter
2 c sugar
3 eggs
3 t vanilla
2/3 c cocoa powder (Dutch process is fine)
1 c AP flour
1/2 t salt
1/2 t baking powder

PB filling
1/2 c butter, softened
1/2 c creamy peanut butter
2 c powdered sugar
~2 t milk

Ganache topping
1/4 c peanut butter
2 c semisweet chocolate chips
1/4 c butter
1/4 c cream

1. Preheat oven to 350. Line a 9×13 pan with aluminum foil to make a sling, or use parchment, and coat with cooking spray. I only used a heavy dose of cooking spray, and that still wasn’t enough for these fudgey brownies, so I recommend lining the pan for once.

2. For the brownies, melt the butter in a large saucepot. Remove from heat, add the sugar and stir to combine. Beat in eggs and vanilla until homogeneous. Add cocoa, baking powder and salt and combine. Add flour last and stir until combined. Spread into pan and bake 25-30 minutes. Cool completely before frosting.

3. For peanut butter filling/frosting, combine the ingredients and beat until smooth. Add more milk if necessary to make it spreadable. Try not to eat all the frosting before your brownies are cool.

4. For the ganache, combine the ingredients in a double boiler or in a microwave safe bowl. Melt together and combine.

5. Once the brownies are cool, spread the frosting on top. Place them in the fridge for at least 30 minutes until the frosting sets up a bit. Pour the ganache over the top and spread gently. Return to the fridge until set. I like to keep them in the fridge and serve cold because the brownies are so fudgey.

Share Button

Pumpkin Piecakes, Pecan Brittle and Stabilized Whipped Cream

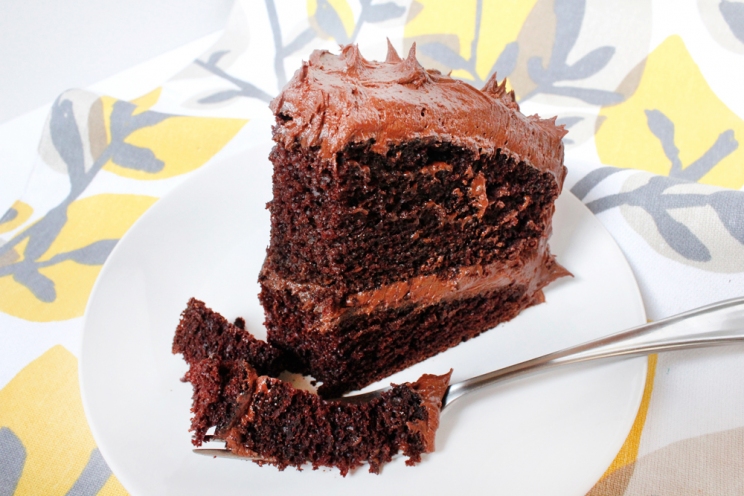
I wasn’t really sure what to call these. Pumpkin pie cupcakes is clumsy and implies a cupcake, which this really isn’t, except for the liner. This is more like a pumpkin pie without the crust. It’s pumpkin pie filling, with a little bit of flour to hold it together and leavener for just a bit of airiness. The edges set up into almost a cake, and the middle stays custardy. And because they fall in the center as soon as you take them out of the oven, they’re just begging for a dollop of whipped cream.

I made these for a work potluck because, having made them before, I knew they were easy to make and perfect for grab-and-go. The only problem was the whipped cream, which would have wept if I made it the night before. So that brings us to the stabilized whipped cream. It was the first time doing so, and I don’t believe I dissolved the gelatin completely before adding it, because there were a few little pearls of gelatin here and there. I doubt anyone but me noticed, though! It didn’t weep, though, so that was ultimately a success.

The pecan brittle was just a little extra something. And boy was it good. I debated using pumpkin seeds, but they were the same price as pecans, and frankly I couldn’t see myself using the leftover pumpkin seeds. So pecans it was. And what a good decision that was! The smell as you’re making the brittle is exactly like pecan pie. The smell is almost better than the finished candy, if you ask me!

I adapted the pumpkin recipe from this blog, but made a few key changes. First, I omitted the generic pumpkin pie spice in favor of my own spice blend. Second, I extended the baking time, because 20 minutes really left you with a mushy product. Yes, it’s custardy, but it should still be firm. Also, don’t be afraid of filling your cupcake liners almost full. Normally that’s a bad idea, but these puff only slightly, and more importantly, fall quite a bit when cooling.

Pumpkin Piecakes

1 15 oz can pumpkin puree
1/2 c sugar
1/4 c brown sugar
2 eggs
1 t vanilla
3/4 c half and half
2/3 c AP flour
1/4 t baking powder
1/4 t baking soda
1  t cinnamon
1/2 t ground ginger
1/4 t each allspice, cardamom, freshly grated nutmeg and salt

1. Preheat oven to 350. Line muffin tin with liners and coat lightly with cooking spray.

2. In a Kitchenaid or large bowl with a whisk, combine eggs and sugars. Add pumpkin, half and half and vanilla and combine.

3. Add your dry ingredients, and combine until smooth.

4. Fill liners almost full, then bake for 23-26 minutes until the top is no longer sticky to the touch. Cool, and serve with whipped cream. Makes a dozen.


Stabilized Whipped Cream

1 t unflavored gelatin
4 t cold water
1 c heavy whipping cream
powdered sugar to taste

1. Add gelatin to cold water in small saucepan and bloom until thick.

2. Cook over low heat until gelatin is completely melted and there are no little pearls of gelatin left. Cool slightly.

3. Whip cream until slightly thick, then pour gelatin into it while whipping slowly.

4. Add sugar to taste, then continue to whip until stiff.


Pecan Brittle

1 1/2 c sugar
1/2 c light corn syrup
2 1/4 c roasted, lightly salted pecans
2 T butter
1 t vanilla
1 t baking soda

1. Prepare the pan you will be pouring the candy into. Use a half sheet pan, or other large sheet pan with low sides. Use silpat if you have it, otherwise coat the pan with cooking spray or butter.

2. In a heavy saucepan or enameled dutch oven with a lid, combine the sugar, water and corn syrup. Cover the pot and bring to a boil over high heat. Swirl the pot occasionally to ensure the sugar melts evenly. Keeping the lid on will cause the steam to condense and drip back down the sides of the pot, preventing any sugar from recrystalizing. If you have no lid or crystals form, you can also wipe down the sides of the pot with water using a pastry brush.

3. Once boiling, insert candy thermometer and boil until it reaches 230 degrees, only about a minute later.

4. Add the pecans and stir constantly with a metal or silicon spatula until it reaches 300 degrees, about 15-18 minutes.

5. Remove from the heat, and immediately add the butter, vanilla and baking soda and stir quickly. It will foam and sizzle.

6. Pour down the center of your pan and spread out so the nuts are in an even layer. Let sit until cool, and break into pieces.

Share Button

Chocolate Chip Cookie Bars

cookiebars

Next time you reach for a box of brownie or cookie mix…STOP! Make these instead. They’re just as fast as a mix, I promise. And chances are you’ll already have all the ingredients already in your pantry if you bake more than once a year. The recipe (from Cook’s Illustrated, once again) makes a 9×13-inch pan that’s just the right thickness, and has the perfect ratio of chocolate to dough.

This is also perfect if you’re feeling lazy but really want chocolate chip cookies. Because who wants to spoon out dough and bake in batches? Not to mention if you’re a fan of chewy, soft cookies, then this is also a recipe for you. OK, it’s really a recipe for everyone, I guess. It’s chewy, chocolatey, one-bowl, super fast and simple. What’s not to love?

Chocolate Chip Cookie Bars

2 1/8 c AP flour
1/2 t salt
1/2 t baking powder
12 T butter
1 c brown sugar
1/2 c sugar
1 egg
1 egg yolk
2 t vanilla
2 c chocolate chips (about one 12 oz bag)

1. Preheat oven to 325. Melt butter in a large microwave safe mixing bowl.

2. Add sugars and mix until combined. Add eggs and vanilla and mix well.

3. Dump in your dry ingredients except chips, and fold together with a spatula or wooden spoon, just until combined. Don’t overmix or the gluten will develop and make the cookies tough. Fold in the chocolate chips.

4. Spread in greased 9×13 pan (the dough will be a little greasy, but don’t worry). Bake until just set in the middle, 27-30 minutes.

Share Button

Vanilla Macerated Strawberries

strawberries

This recipe, if you can even call something this simple a recipe, is all about a technique that also happens to be one of my favorite words: macerate. Isn’t that a lovely word? It evokes what happens when you macerate fruit; it gets all juicy and a little squishy and all the goodness runs out to make it’s own syrupy sauce. Yum.

Again, this is another thing that doesn’t really have a recipe, but I’ll do my best. Serve it over vanilla ice cream as we do most of the time, or in strawberry shortcake, or in a yogurt parfait, or on oatmeal, or on pancakes or waffles…You get the idea. It’s good on everything.

Vanilla Macerated Strawberries

strawberries, sliced
white sugar, to taste, but at least a couple tablespoons
half a vanilla bean

1. Slice the half vanilla bean in two lengthwise, then scrape the seeds into a bowl with the strawberries and sugar. Mix thoroughly, then let sit on the counter or in the fridge for 30 minutes. Mix again, then serve. The sugar will bring out all the juices from the fruit and create a syrup. You don’t have to eat this right away, but the fruit breaks down the longer it sits, so I usually use it within a day, otherwise the strawberries start losing their color and get mushy.

Share Button

Blueberry Crisp

crisp

Blueberries were on sale at Sendik’s, 4 pints for $5. Not too shabby. I bought them before I knew what I was going to do with them…An impulse buy I guess. In the end I decided to make crisp, as oppossed to cobbler, buckle, crumble, grunt or whatever other regional variation of fruit+carbs. I almost always have everything already on hand for crisp, I love oats, and it’s super easy. Crisp is a great way to use up those impulse berries you buy this summer.

This is a general recipe as I never really measure crisp ingredients. For the fruit, if you like it thicker, add more cornstarch. If your berries are sour and not ripe, add a bit more sugar. For the topping, you’re looking to add enough butter that it turns into wet, coarse sand. If you squeeze it together in your hand, it will hold it’s shape, then crumble into large chunks.

Blueberry Crisp

4 pints blueberries, washed and picked over
1/2 to 3/4 c sugar, to taste
3-4 T cornstarch
1 T lemon juice
2/3 c flour
2/3 c brown sugar
2 t cinnamon
1/2 t salt
1 1/2 c rolled oats
1 stick butter, chilled and diced

1. Preheat oven to 350. Combine fruit, sugar, cornstarch and lemon juice in a bowl. Pour into a 9×13 pan.

2. Combine flour, brown sugar, cinnamon, oats and salt in a bowl. Add chilled butter chunks and work with fingers, fork or pastry cutter until butter is evenly distributed and mixture holds its shape when squeezed. Squeeze mixture, then crumble coarse chunks over the fruit. Bake until browned and bubbly, 30-40 mintues.

Share Button